Unlock the Golden Goodness: How to Roast Garlic Perfectly Every Time
Roasted garlic is a culinary revelation, transforming pungent raw cloves into sweet, mellow, and buttery morsels that elevate virtually any dish. It’s a secret weapon in many chef's arsenals, taking meals from mundane to restaurant-worthy in seconds. If you've ever wondered how to roast garlic, you're in the right place. This comprehensive guide will walk you through various methods, tips, and creative uses, ensuring your kitchen smells amazing and your taste buds are delighted. Once roasted, garlic cloves soften to a spreadable texture, making them incredibly versatile. Imagine swirling them into mashed potatoes, mixing them into a compound butter for toast, puréeing them into marinades, or whisking them into a decadent aioli. Beyond just enhancing flavor, substituting smashed roasted garlic for fresh chopped garlic provides a nuttier, sweeter, and significantly less pungent profile, offering a new dimension to your favorite recipes.Why Roast Garlic? The Flavor Transformation & Culinary Magic
The magic of roasted garlic lies in a chemical transformation. The intense, sharp allicin compound found in raw garlic breaks down under heat, converting into milder, sweeter, and more complex flavors. This process results in cloves that are buttery, lightly caramelized, and possess a profound depth of sweetness.- Unforgettable Flavor Profile: The harsh bite of raw garlic is replaced by a sweet, nutty, and savory richness that is incredibly addictive. It's a unique taste that stands alone, yet enhances everything it touches.
- Culinary Versatility: Roasted garlic is a true chameleon in the kitchen. Its soft, spreadable texture makes it ideal for:
- Spreads: Simply smear it on crusty bread, bagels, or crackers.
- Mix-ins: Fold it into mashed potatoes, hummus, scrambled eggs, or pasta sauces.
- Marinades & Dressings: Purée it into vinaigrettes, marinades for chicken or fish, or even a homemade aioli. For instance, combining a generous amount of roasted garlic with Dijon mustard can create a marinade with unparalleled mellow sweetness and savory richness.
- Substitutions: Use it anywhere you'd use fresh garlic for a milder, more complex flavor.
- Health Benefits: While primarily celebrated for its flavor, garlic also boasts health benefits, including being high in antioxidants. Roasting might slightly alter some nutrient levels, but it certainly doesn't diminish its deliciousness.
If you're looking for even more depth on the versatile uses of this golden delight, check out how to roast garlic - Article 1.
Mastering the Art of Roasting Garlic in the Oven
The oven is the quintessential method for roasting garlic, providing even heat that coaxes out its deepest flavors. The beauty is that you can roast a single head or a dozen using the same straightforward process.Step-by-Step Oven Roasting:
- Preheat Your Oven: Set your oven to 375°F (190°C).
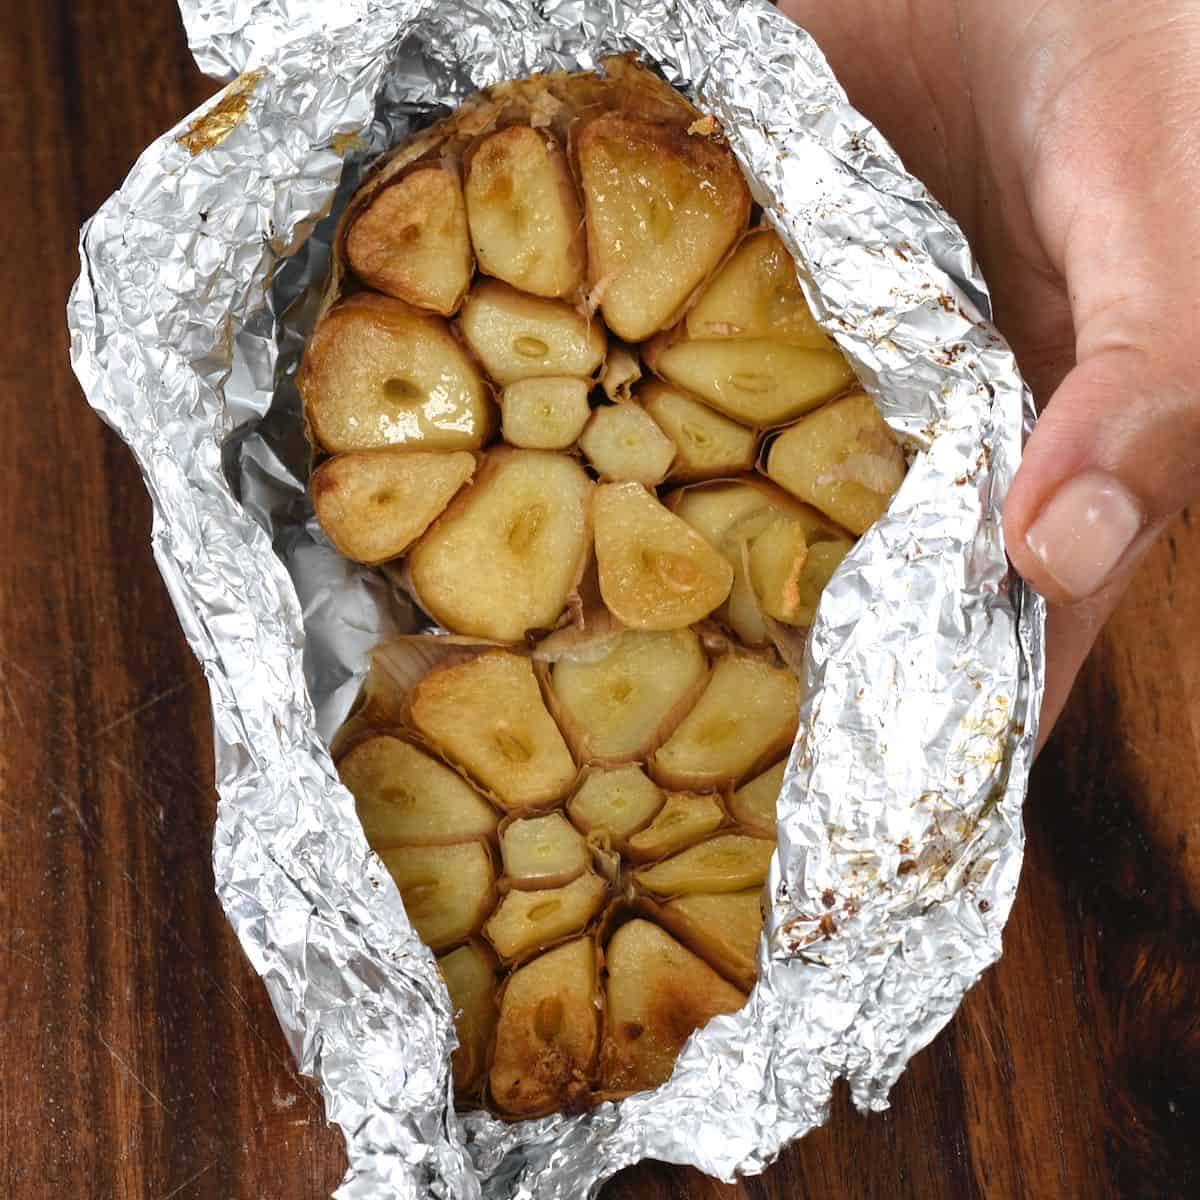
- Prepare the Garlic: Take each head of garlic and carefully slice off the top 1/4 inch. This reveals the individual cloves, allowing them to soften and caramelize evenly.
- Season and Wrap: Place up to four garlic heads, cut-side up, on a piece of aluminum foil. Drizzle each head with about a teaspoon of good quality olive oil. This helps with caramelization and prevents drying. Sprinkle each with a pinch of salt. For an extra layer of flavor, consider adding a sprig of fresh thyme or rosemary. Fold the foil to completely enclose the garlic heads, creating a tight packet.
- Roast to Perfection: Transfer the foil packet(s) to the preheated oven. Roast for 45 minutes to 1 hour, or until the cloves are deeply softened, golden brown, and easily squeezed from their skins. The cooking time can vary based on the size and freshness of your garlic.
- Cool and Extract: Remove the garlic from the oven and let it cool in the foil packet for at least 15 minutes. This cooling period is crucial; it allows the garlic to continue steaming gently and become even more tender, making extraction easier. Once cooled, simply squeeze the softened cloves from their papery skins into a small bowl. Discard the skins.
Tips for Optimal Oven Roasting:
- Batch Size: You can roast multiple heads at once. Just ensure each packet contains no more than four heads for even cooking and a secure seal.
- Foil Quality: Use heavy-duty aluminum foil to prevent tearing and ensure the packet remains sealed throughout roasting.
- Doneness Check: If after 45 minutes your garlic isn't quite soft enough, re-seal the foil and return it to the oven for another 10-15 minutes.
Quick & Convenient Methods: Air Fryer and Microwave
While the oven offers classic results, sometimes you need speed or efficiency. The air fryer and microwave offer excellent alternatives for how to roast garlic when time is a factor.Air Fryer Roasting: The Countertop Convection Advantage
An air fryer is essentially a compact convection oven, making it an excellent tool for roasting garlic with results almost identical to a conventional oven, often in a slightly shorter timeframe due to its smaller cavity and direct heat circulation.
- Preheat: Preheat your air fryer to 375°F (190°C).
- Prepare Garlic: Follow the same preparation steps as for oven roasting: cut off the top 1/4 inch, drizzle with olive oil, and sprinkle with salt.
- Wrap and Cook: Place up to four garlic heads, cut-side up, on a piece of aluminum foil and fold to completely enclose them. Transfer the foil packet to the air fryer basket.
- Roast: Cook for 40-55 minutes, or until the cloves are softened and beginning to brown. Keep an eye on them, as air fryer times can vary.
- Cool and Extract: Remove, cool for 15 minutes, then squeeze out the cloves as you would with oven-roasted garlic.
The air fryer is fantastic for smaller batches and can be a real time-saver if you don't want to heat up a large oven.
Microwave Roasting: When Time is of the Essence
For those moments when you're truly tight on time, the microwave offers a shortcut to softened garlic cloves. It's important to note that microwave garlic is technically steamed rather than roasted, so it won't develop the same deep caramelization or complex depth of flavor as its oven or air-fried counterparts. However, the softened cloves are still incredibly delicious and perfect for quick applications.
- Prepare Garlic: Cut off the top 1/4 inch of up to four garlic heads. Drizzle each with a teaspoon of olive oil and a pinch of salt.
- Wrap: Instead of foil, wrap each garlic head tightly in a damp paper towel. Alternatively, you can place the seasoned garlic heads in a microwave-safe dish with a tablespoon or two of water, then cover the dish tightly with plastic wrap or a lid.
- Microwave: Cook on high for 2-4 minutes, checking for softness. Larger or more heads will require more time.
- Cool and Extract: Let cool for a few minutes before handling. Squeeze out the softened cloves.
While the flavor won't be as profound, microwave-softened garlic is a great solution for quick sauces or spreads when you need that mellow garlic essence in a flash. For a deeper dive into common pitfalls and expert tips across various methods, our guide on how to roast garlic - Article 2 offers invaluable insights.
Creative Ways to Use Your Roasted Garlic
Now that you've mastered how to roast garlic, the possibilities are endless! Here are some creative ideas to inspire your culinary adventures:- Spreads and Dips:
- Mix with softened butter for a delectable compound butter for roasted garlic bread or steak.
- Mash into hummus or white bean dip for an extra layer of flavor.
- Stir into cream cheese for a savory bagel spread.
- Enhancing Main Dishes:
- Swirl into mashed potatoes, cauliflower mash, or polenta.
- Add to pasta sauces, risottos, or grain bowls.
- Incorporate into vinaigrettes, marinades, or rubs for roasted meats and vegetables.
- Spread onto pizza crust before adding other toppings.
- Simple Delights:
- Simply spread on crusty baguette slices for an elegant appetizer.
- Add a few cloves to scrambled eggs or omelets for a gourmet breakfast.
Make-Ahead & Storage Tips:
Roasted garlic can be prepared in advance, making meal prep a breeze. Once extracted, store the softened cloves in an airtight container in the refrigerator, covered with a thin layer of olive oil, for up to 5-7 days. For longer storage, you can freeze individual cloves or a purée in an ice cube tray, then transfer the frozen cubes to a freezer-safe bag for up to several months. Always ensure proper sanitation when storing garlic in oil to prevent botulism; keep it refrigerated and use within the recommended timeframe.
